
Carving Wax Rings at Home
It’s harder than you think!
I’ve talked about pretty much everything we’ve done in lockdown so far. We’re now starting to repeat those activities, so I won’t bother telling you about them again. (e.g. I made crispy chilli beef again…ooooo). I do feel like life is starting to shift a little bit though. More cafes and restaurants are offering take-aways nearby and there are even a few pubs doing take-away beers. On Sunday I met up with a friend for a socially distanced walk from Walthamstow wetlands to Olympic Park. We found a pub with an outside area serving beers and it was such a joy to sit with a friend and drink beer in the sun. It almost felt ‘normal’ (whatever that is!?). On Monday, me and Charlie went to the park and drank beer there (also a joy). The only problem was I had to run home for a wee after two cans. The lack of public toilets is going to be a real issue for casual park beverages! In case there are eyebrows raising, I regularly sanitised my hands and maintained a strict 2m distance on both occasions! It feels like people are still taking the rules very seriously here, which makes them a whole lot easier to follow, thankfully.
Some of you may have already come across wax ring carving kits online. They’re pretty popular at the moment, particularly with lockdown going on. But if you haven’t, here is a brief introduction …. Wax ring kits include a chunk of wax that you can carve into a ring using a craft knife. You can then have your masterpiece cast in gold or silver of whatever metal you like. The wax ring alone is quite fragile and not wearable, it is just part of the process of making a metal ring. This post just talks about the carving bit, with a bit about casting at the bottom. Making jewellery isn’t a particularly low cost hobby but this is a good intro to one of the methods available to you.
Project time – 2 - 10 hours
Price – About £10 - £30
Pros
Low cost, high value
On trend
Perfect if you like a challenge
You can personalise to the max
Cons
Difficult to get the hang of
Requires patience
I genuinely thought I would be better at this make. I’ve made jewellery before and I’ve even carved wax before, but I just really struggled to get everything symmetrical. I realised after all my experiments that an abstract ring would definitely have been the way to go on this one. But it’s all a learning process! The basic tools are easy to come by and you can get a wax ring tube for about £10 which will make at least 15 rings depending on how chunky you want them. I’ll go into a bit more detail at the end about how you can get them cast in gold or silver but even without casting, this activity is a great design and make process where you can test your jewellery skills for minimal cost.
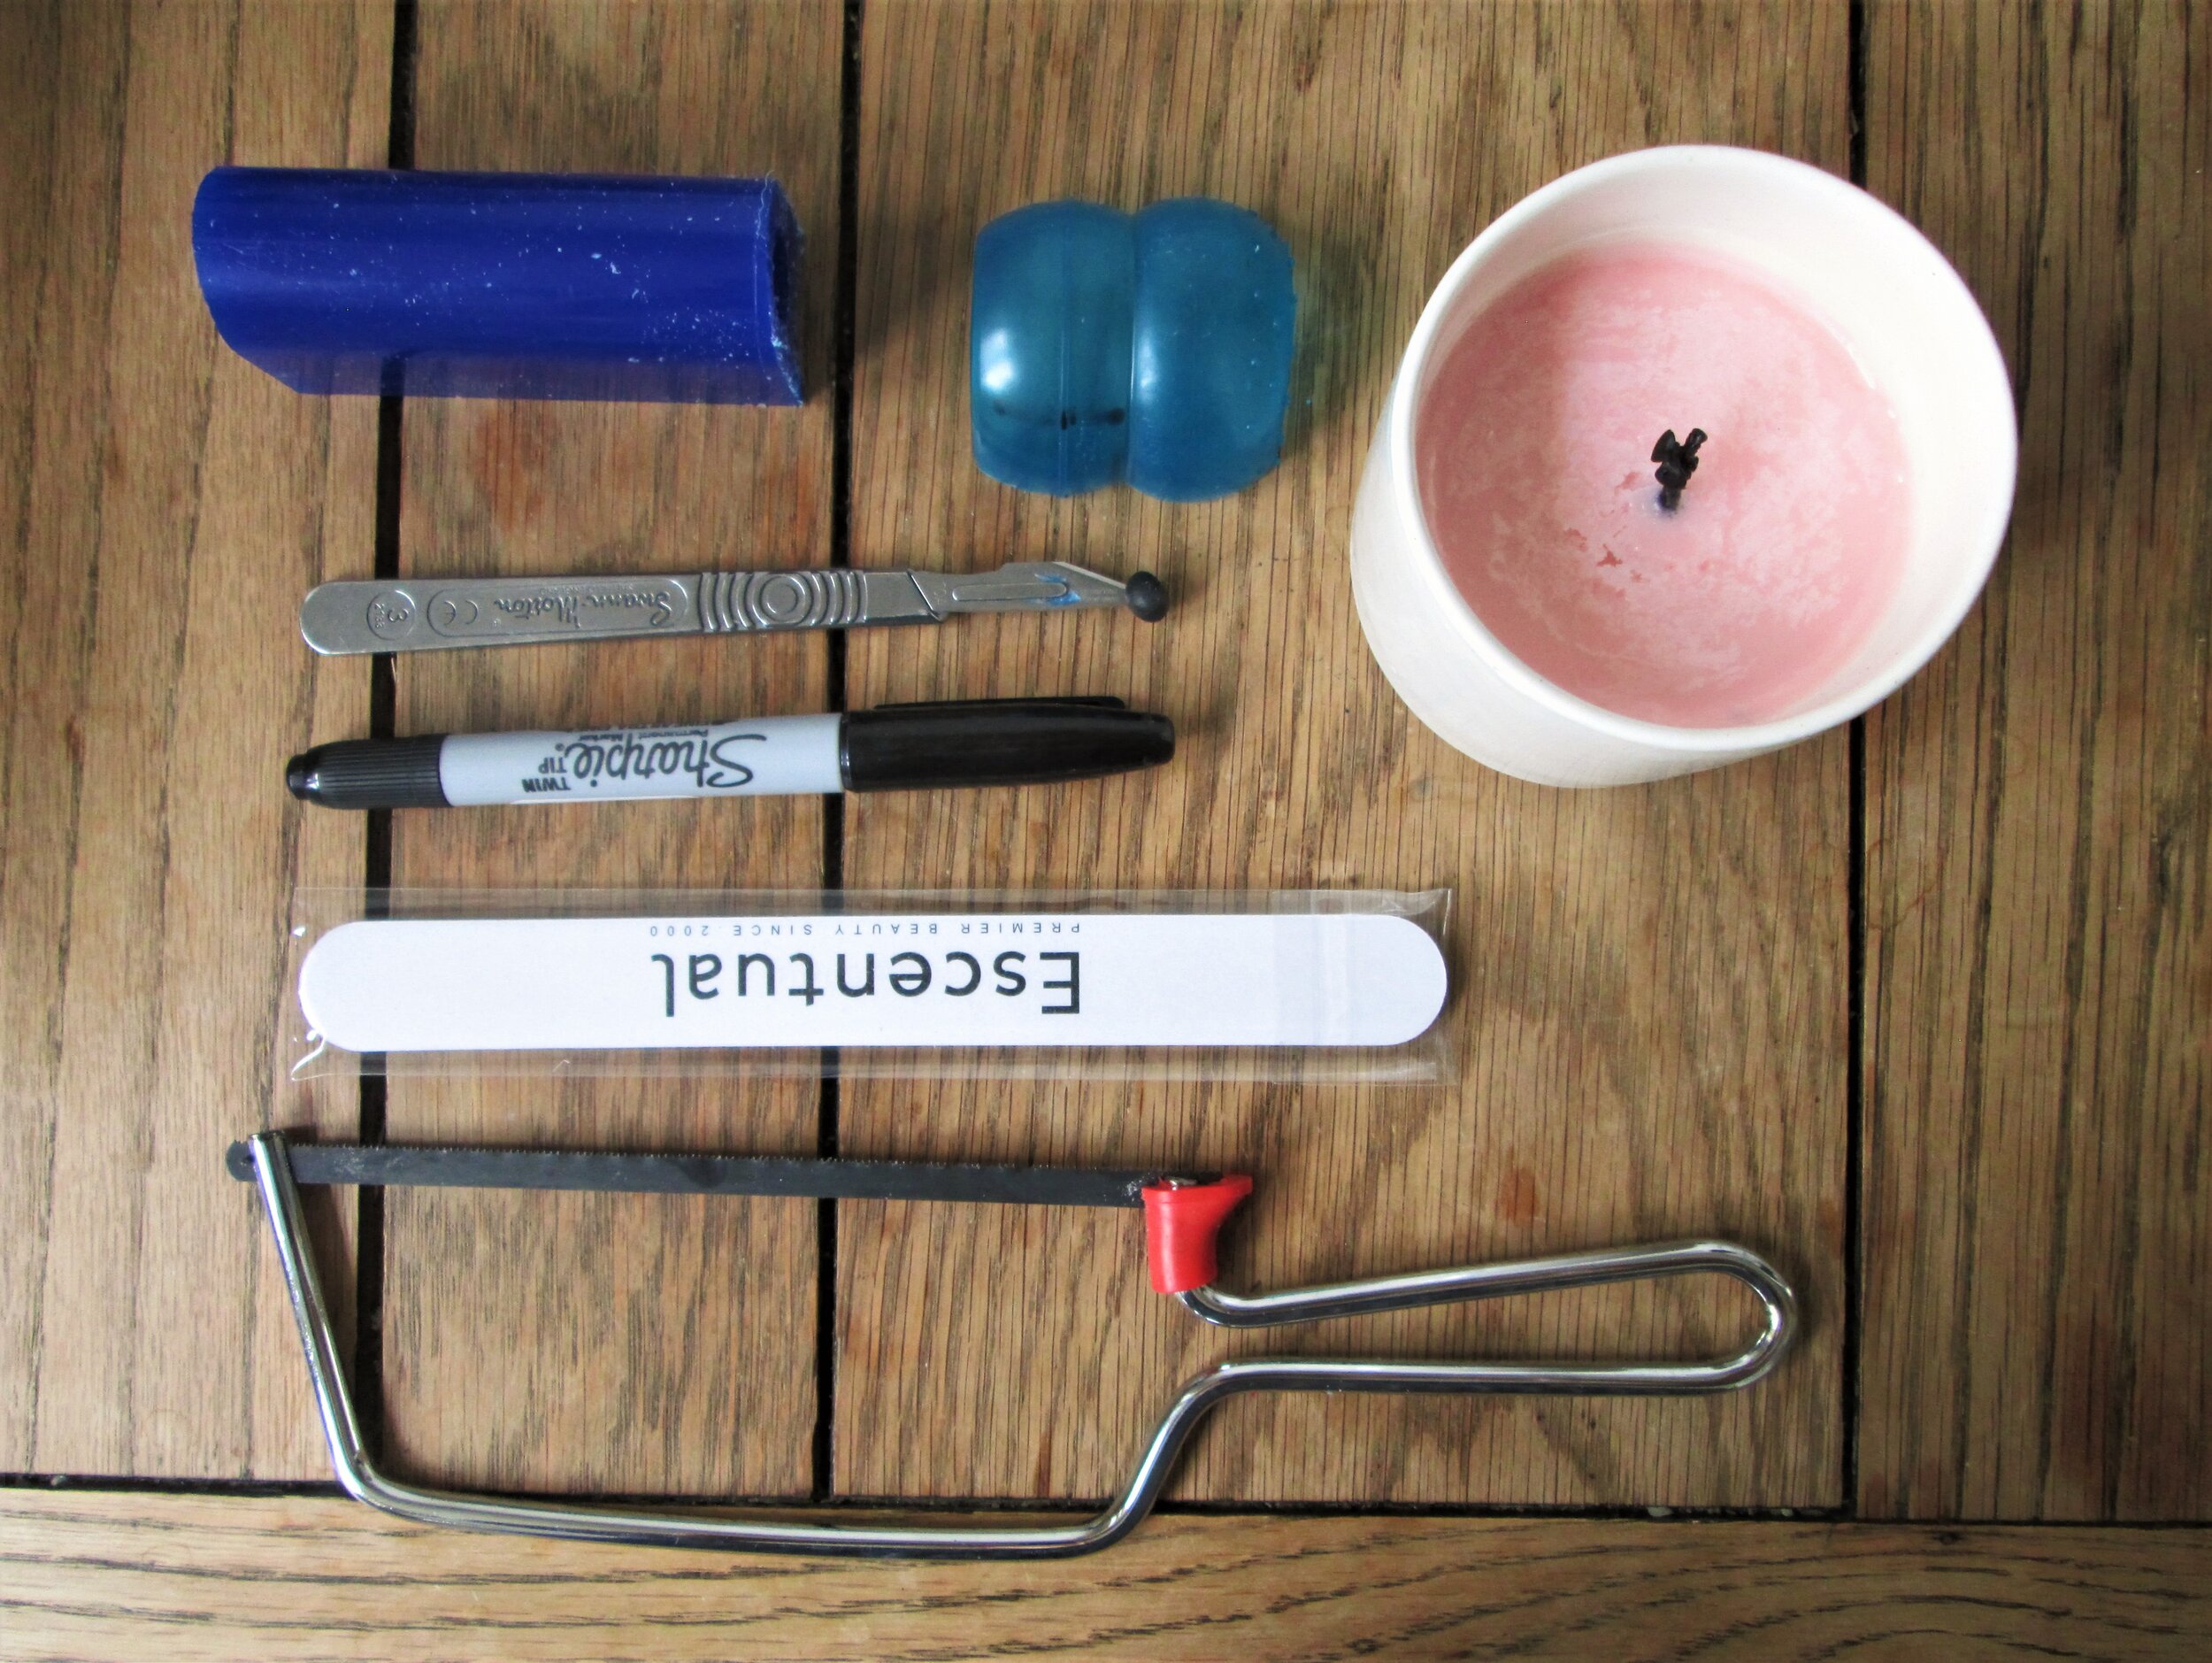
Tools
Blue wax ring tube - this one is ideal for both round and signet ring designs
Craft knife or box cutter
Saw for cutting the wax
Sharpie/permanent marker
Sandpaper or emery board
Chopsticks/pencils
Candle
Thimble - you can buy one like this or make your own like I did below (don’t laugh, this is serious crafting!)

Before I get started properly, I want to be clear that these are experiments I’ve done with wax and by no means is the following information meant as a comprehensive tutorial for carving wax rings. Some methods I’ve made up and some I’ve researched online, none of them are pro! If you want expert tuition there are lots of amazing kits and workshops out there. The original wax ring carving kit was put together by The Workbench. These girls have a fantastic reputation and are pretty well known. Maggie Cross also offers a great, lower cost option. Both of these kits include lost wax casting and finishing in the price so you don’t have to organise that yourself. Another alternative is from the wonderful Rose Wood Jewellery who has just released her kits (pics below) where you can buy the kit for £25, carve your ring and then if you like it you can book with her to sand cast it yourself under her expert guidance in the workshop. Her casting workshops are about £75 and you can cast up to 3 things. If you don’t fancy the casting or live far away, for £85 (inc. kit) she can cast it for you. It really depends what kind of experience you want.
If you’re a bit of a do-it-yourself type like me, read on! At the bottom I’ve listed a casting company with estimated costs so you can asses your options. I’ll be casting my rings with Rose and doing a whole post dedicated to that so you can see a bit more of what is involved. If you want a pro finish, it’s always good to have a pro on board!

Rose Wood Jewellery’s new ring carving kit has everything you need to get a great finish.
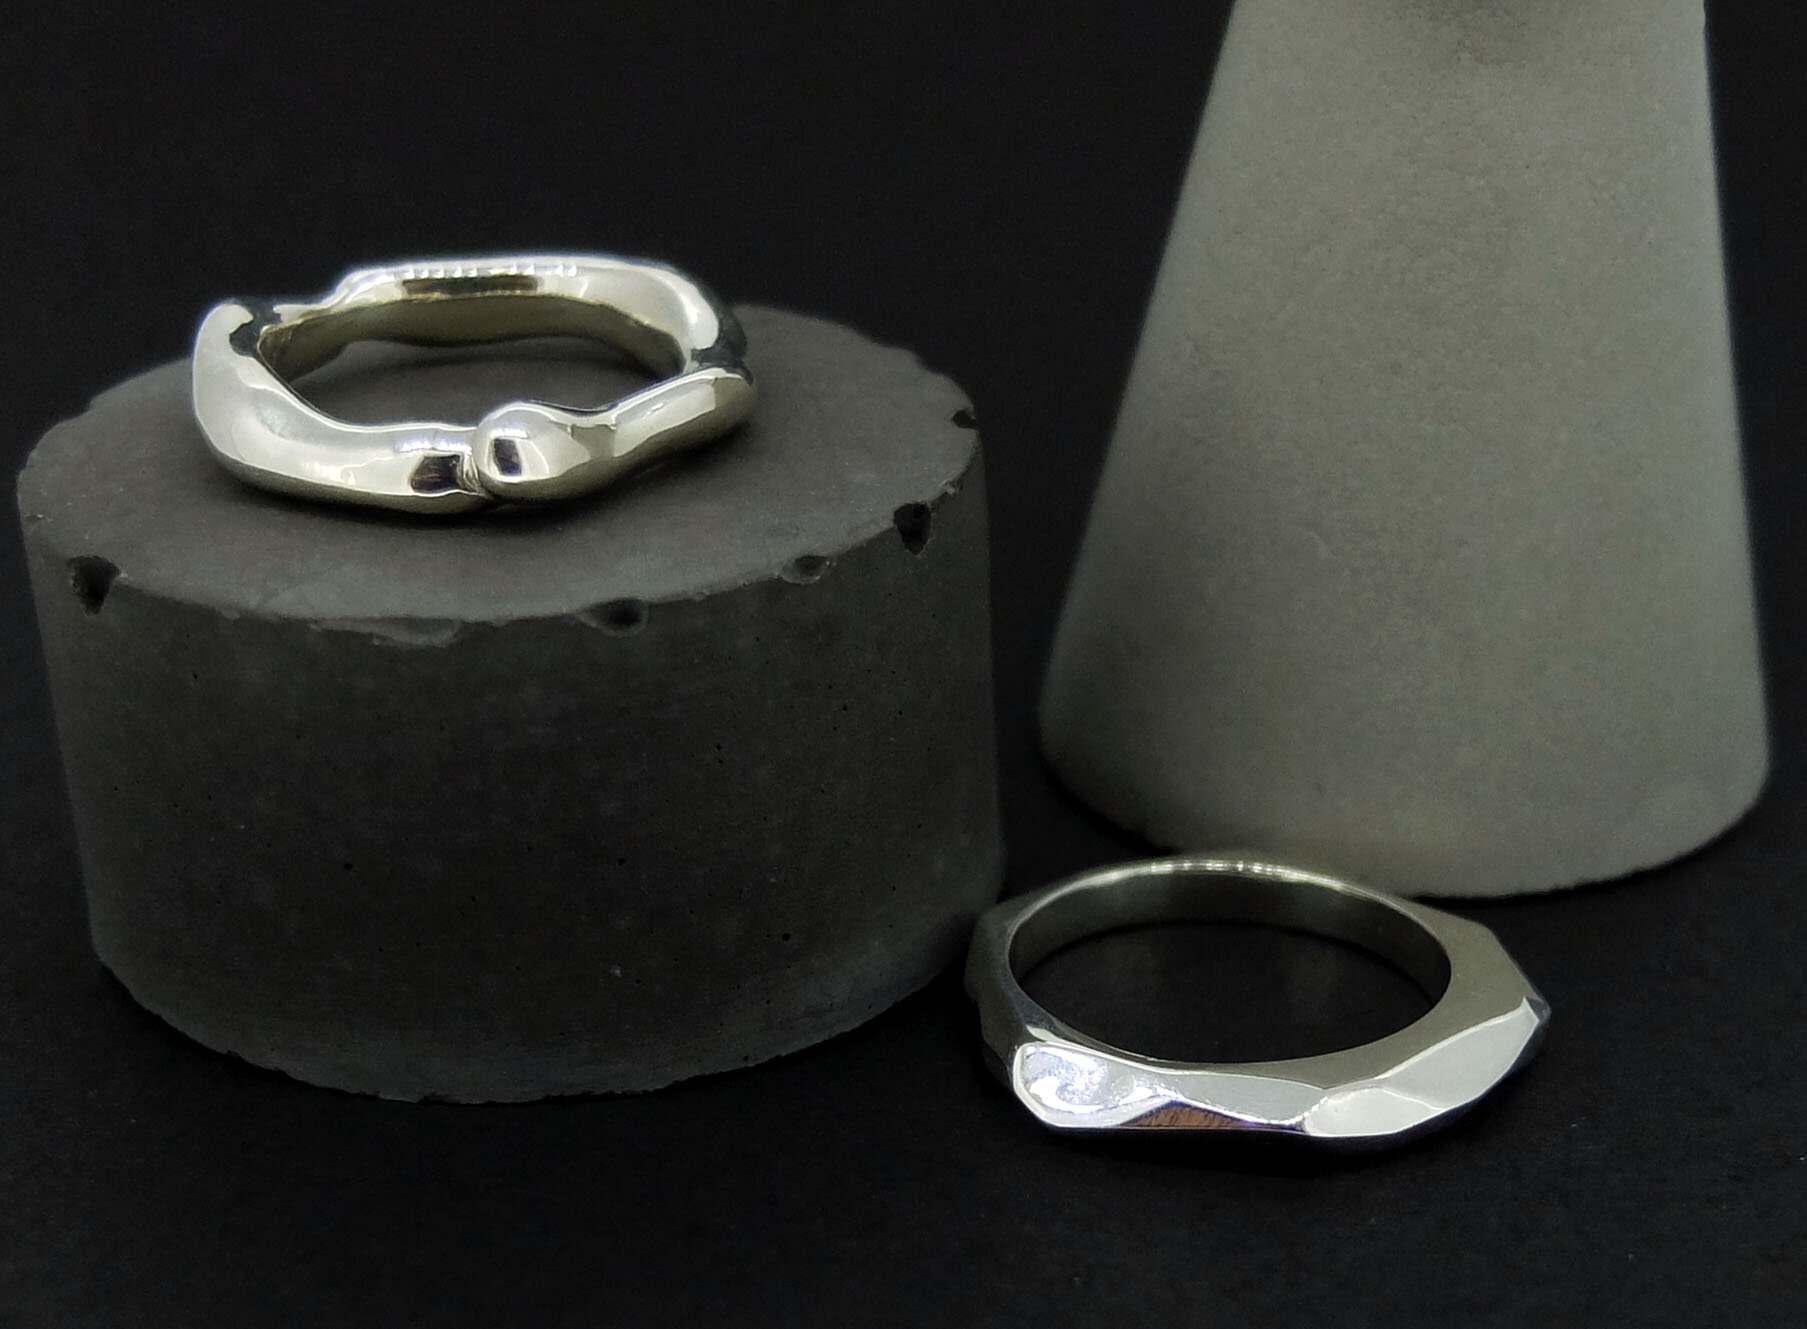
These are the results you can get from sand casting in Rose’s workshop.
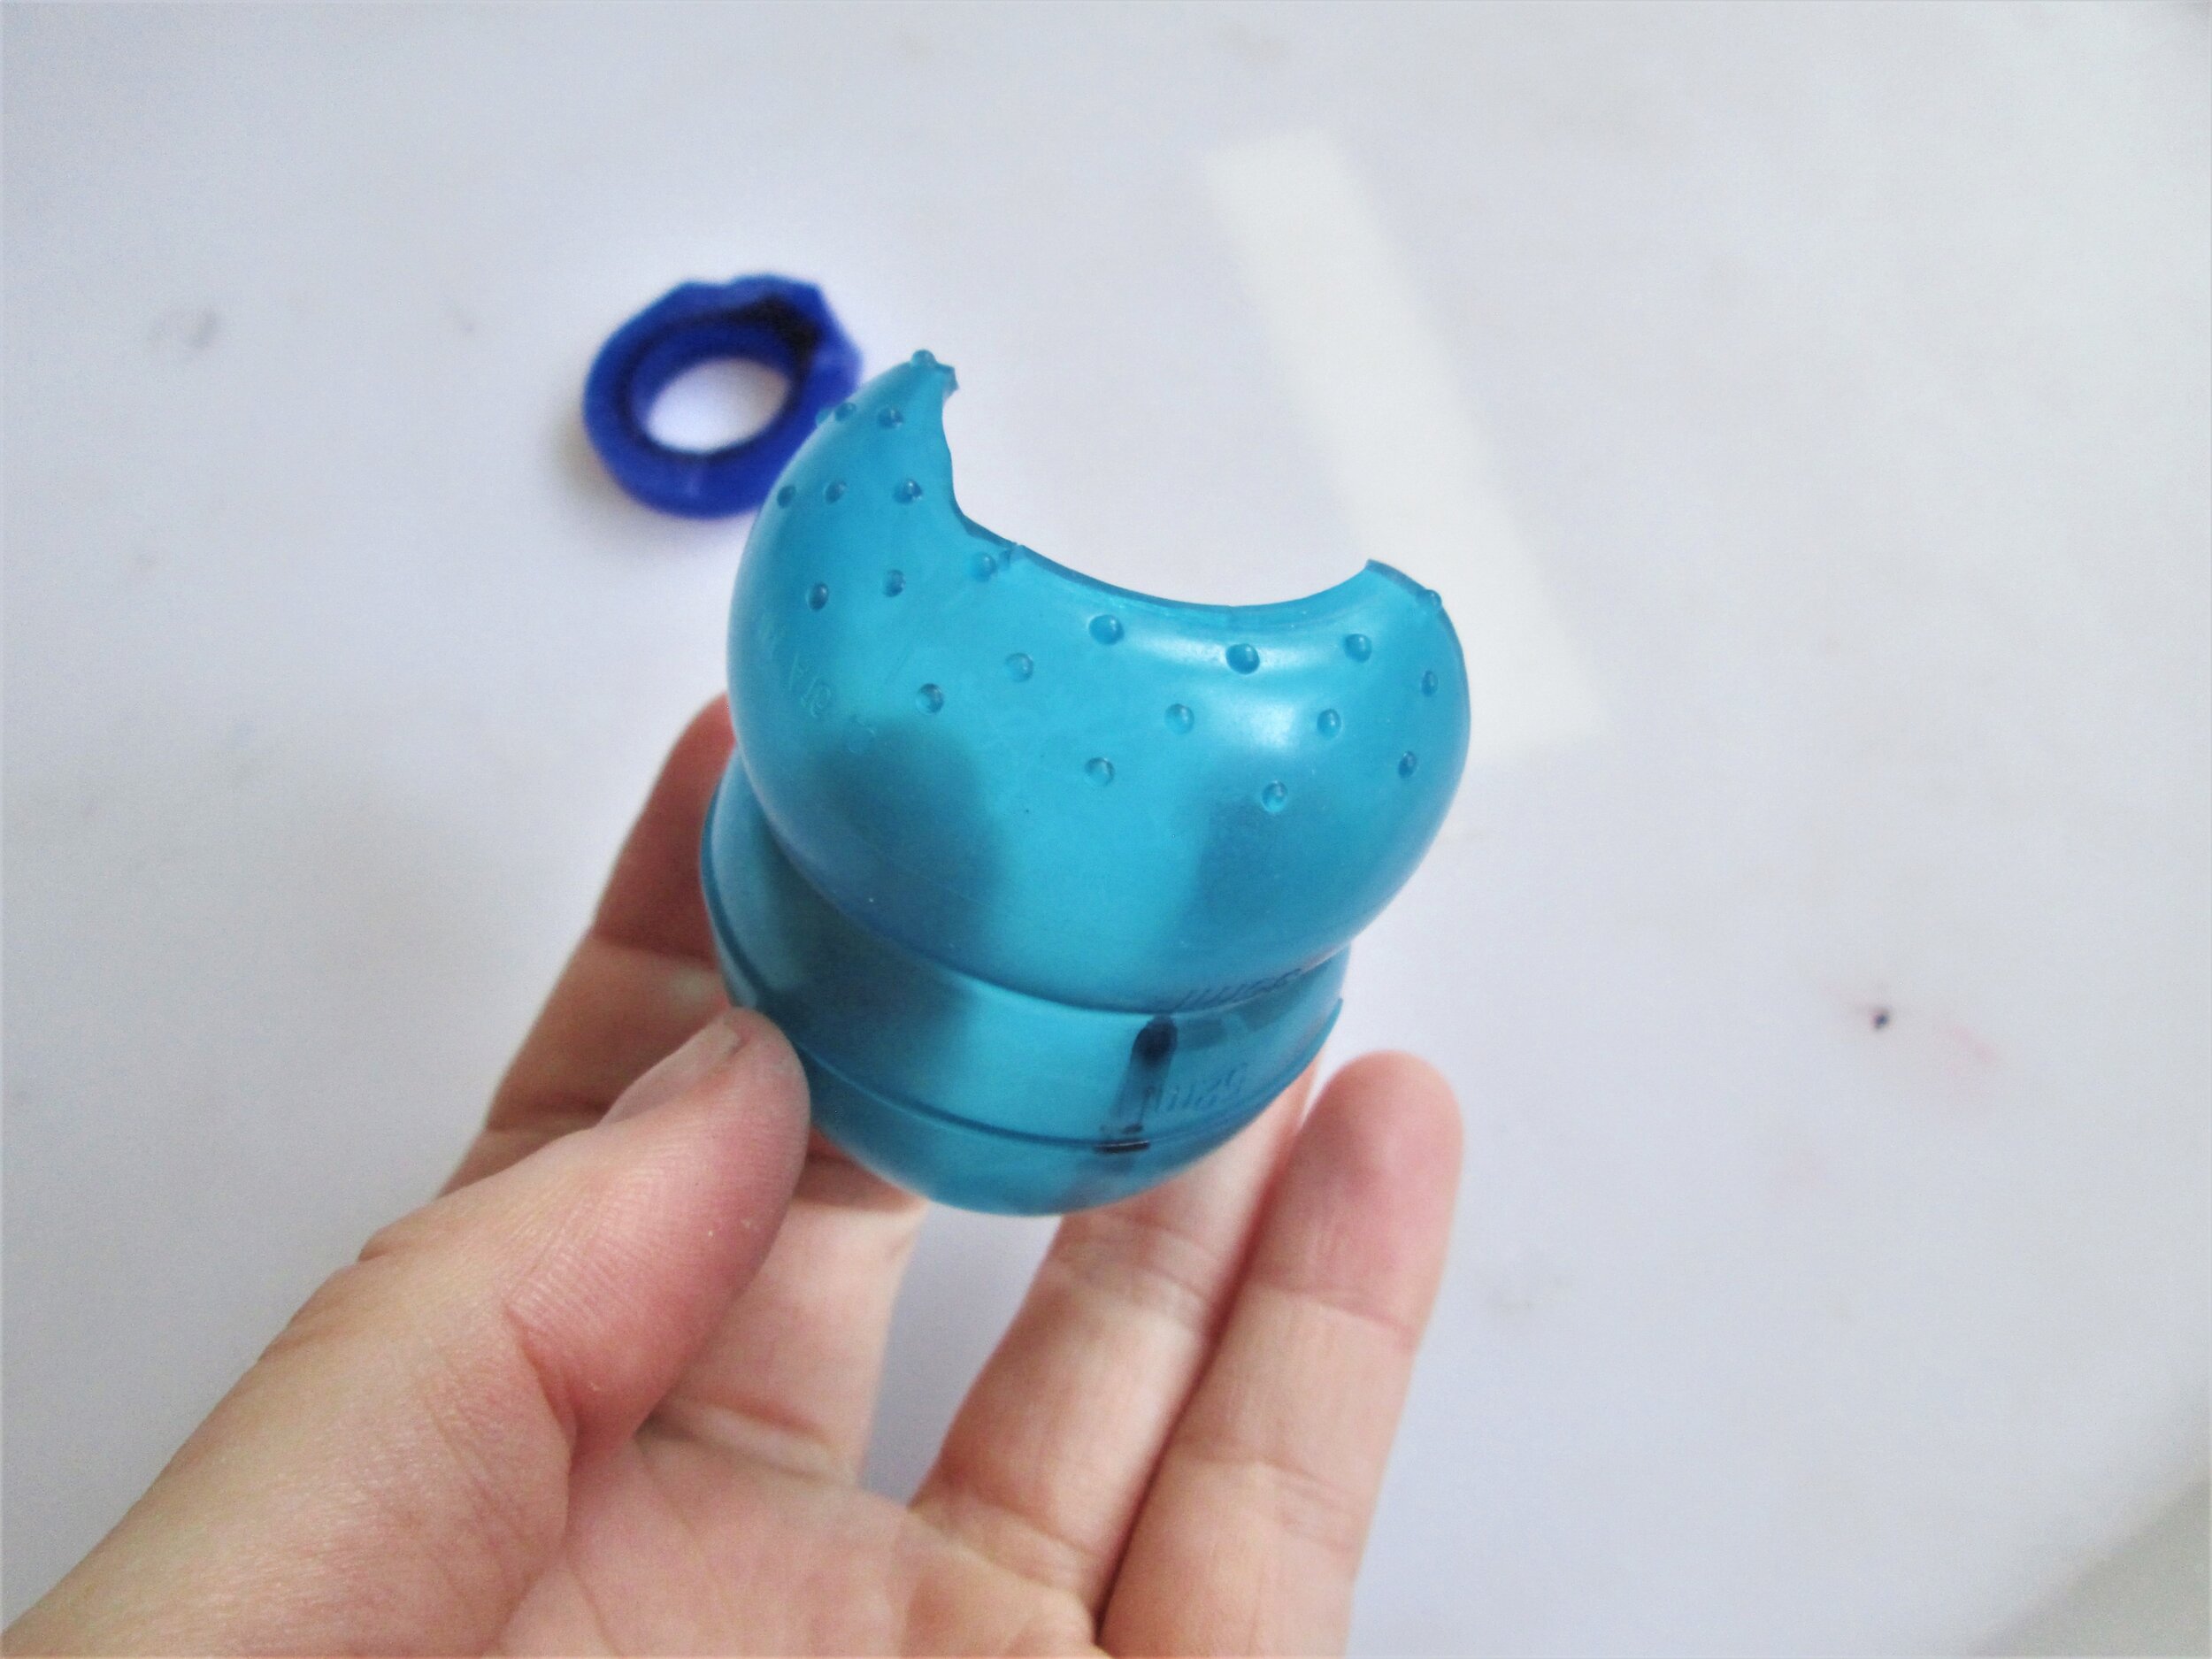
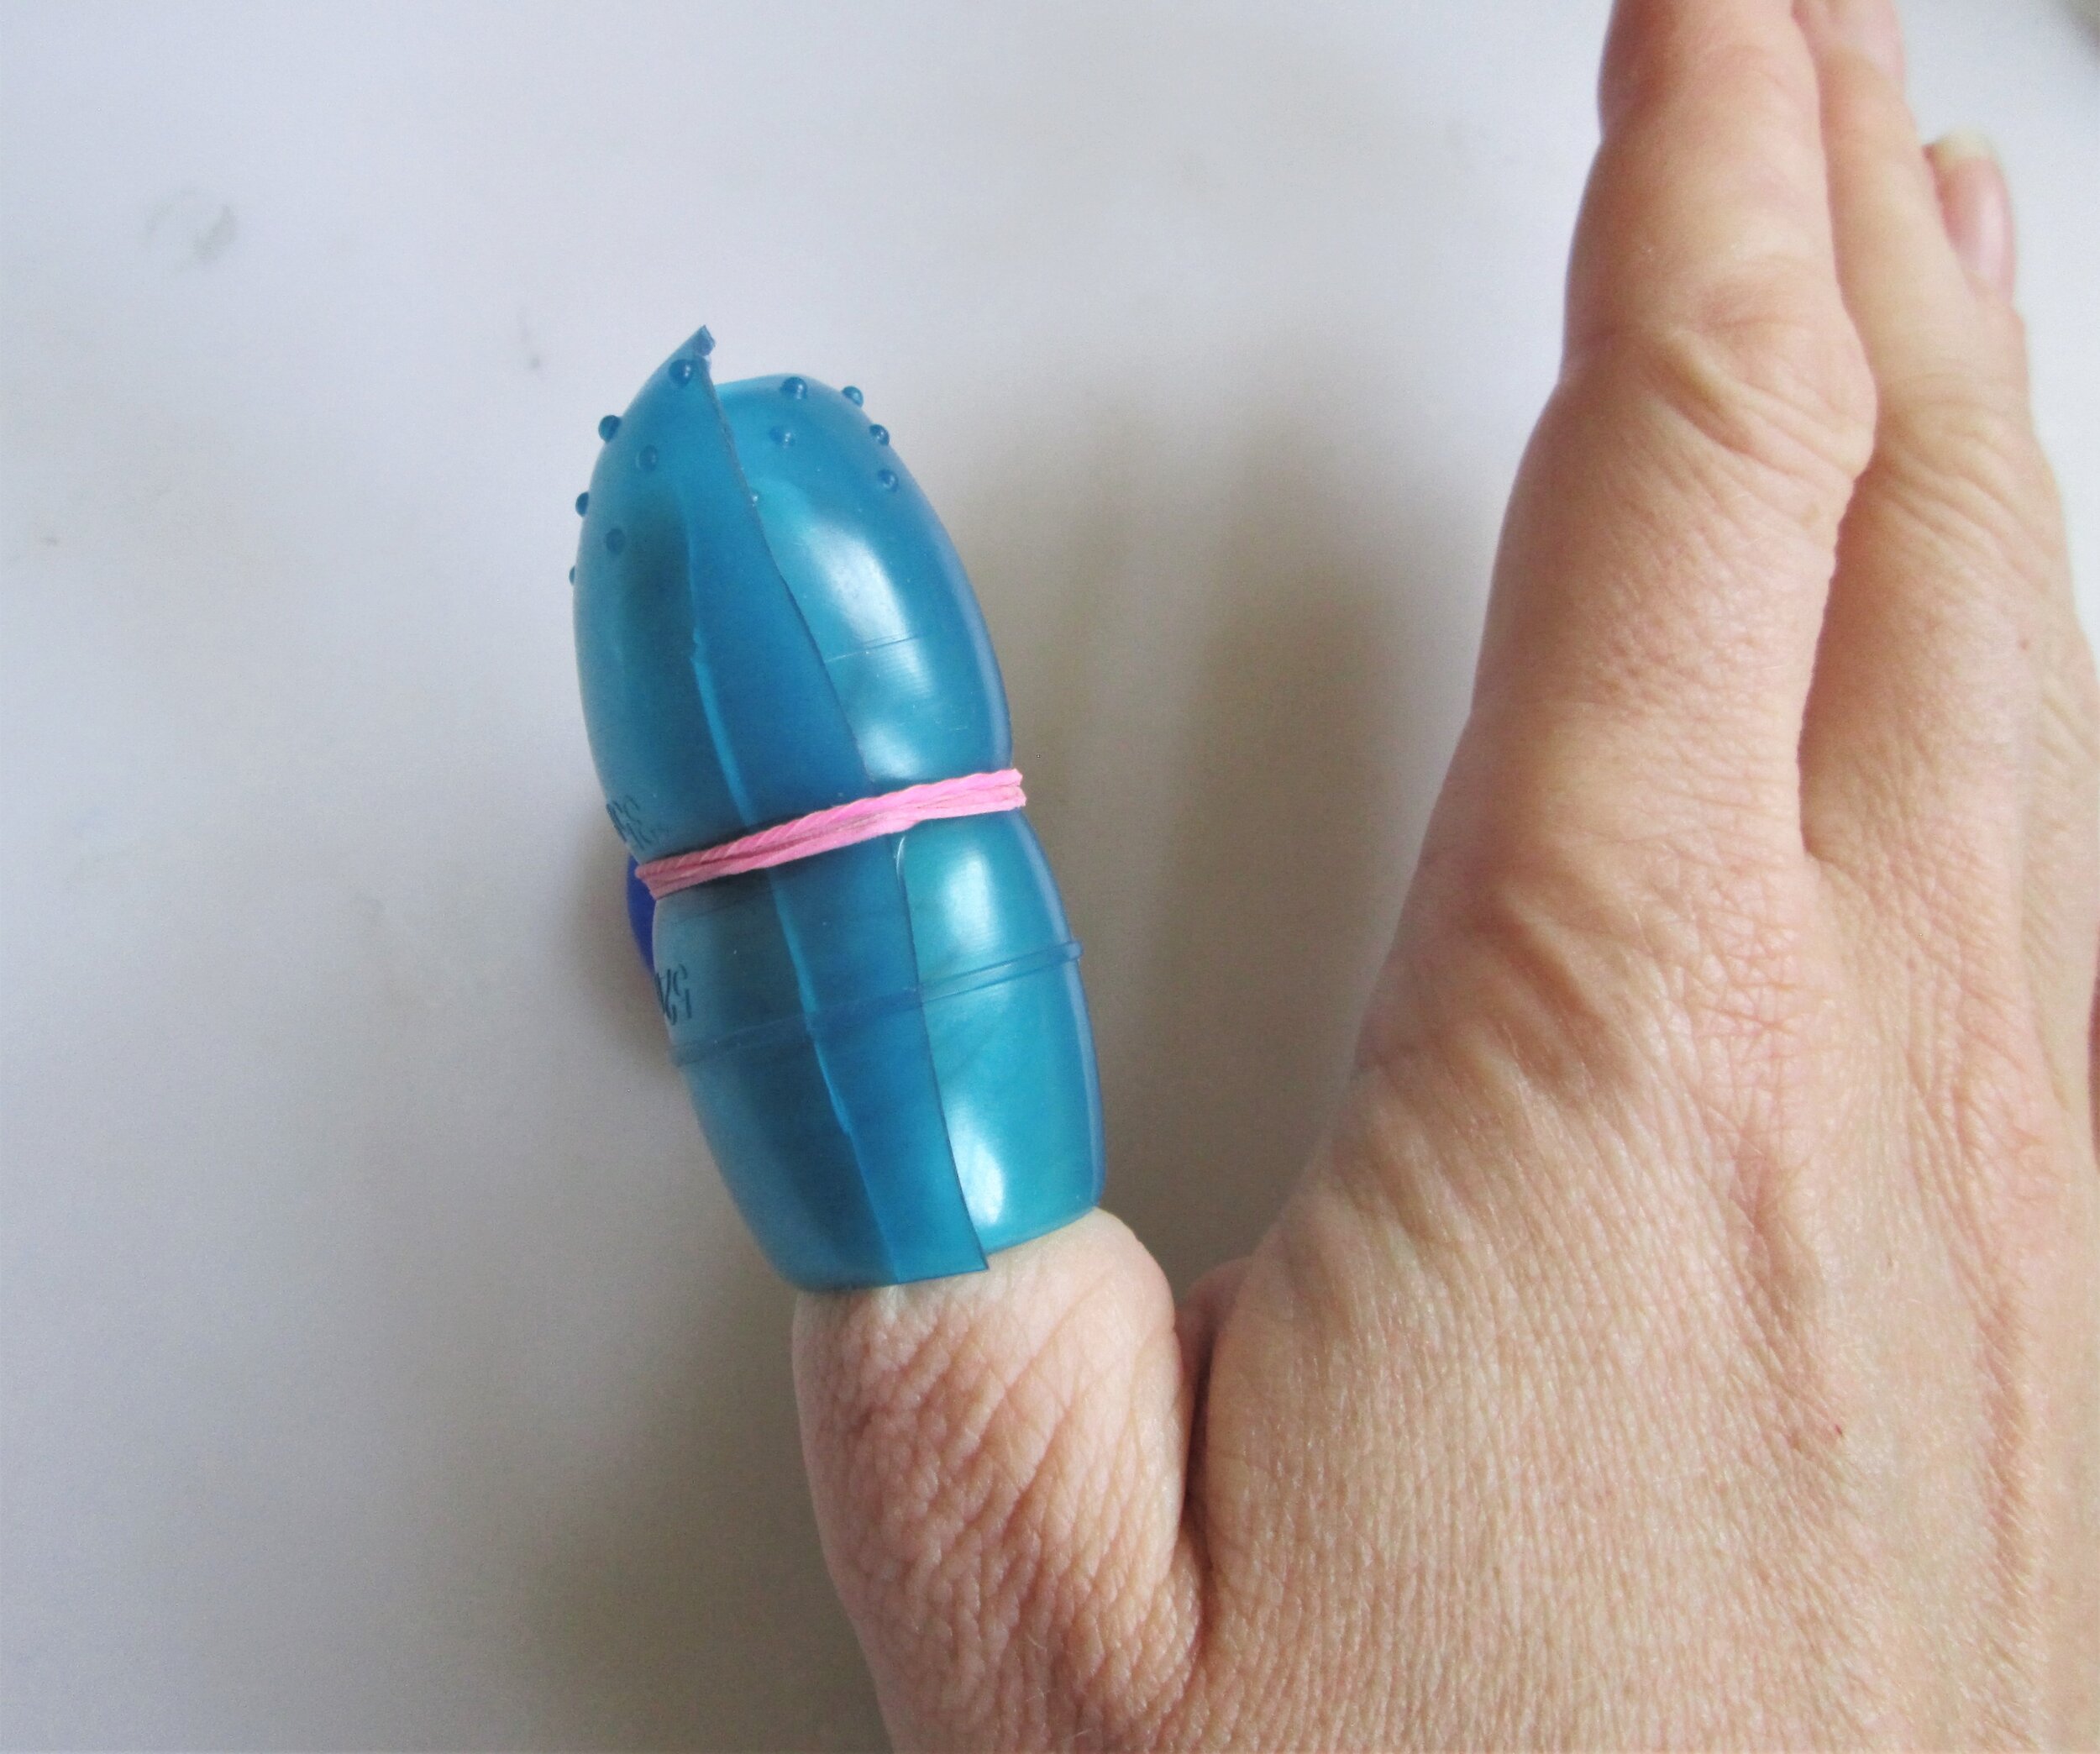
I’ll start by quickly showing you what I used as a thimble. I’m sure you can use metal ones but the silicone ones are best because they are flexible and prevent your blade from going blunt on impact. Plus you can get them to cover your whole thumb. Either way, I don’t have a thimble here and as I’m not going to be taking up wax ring carving permanently, I didn’t want to invest in one. The next best thing I could find was a silicone measuring cup that came with the washing powder. I cut it in half and tied an elastic band around it and it worked fine. I know it looks a bit ridiculous, but it did the job!
Getting started
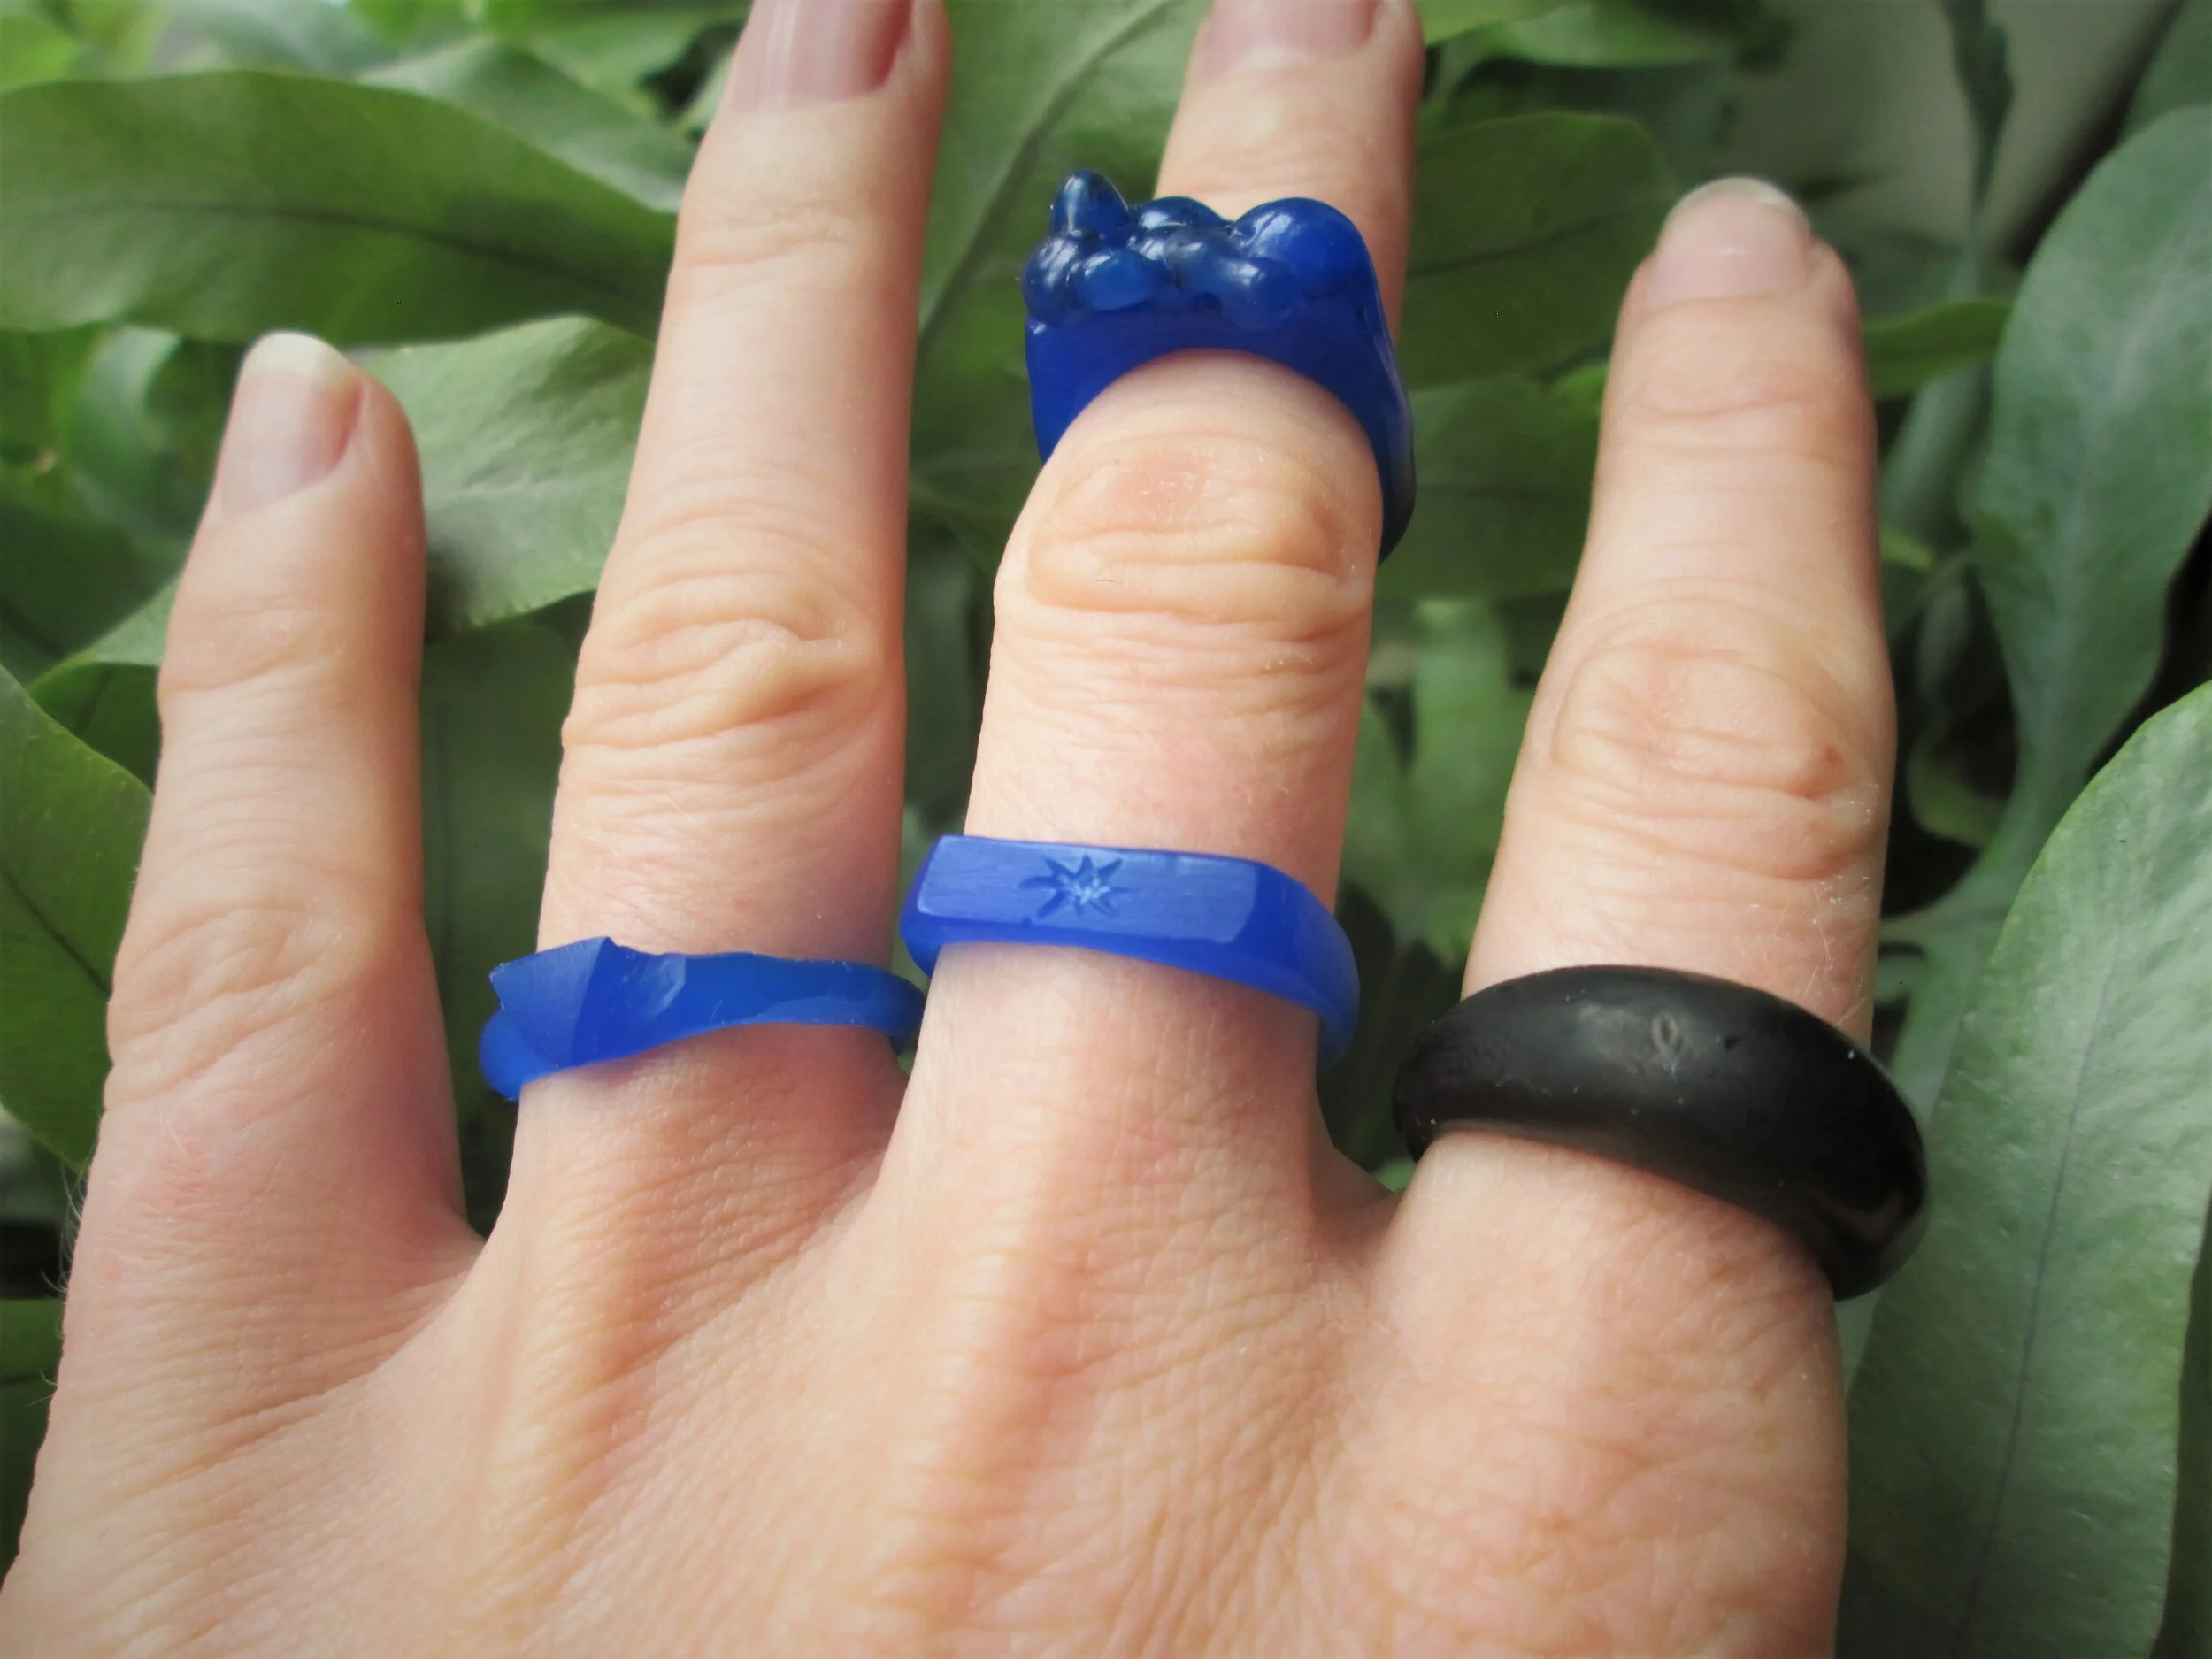
Start by drawing your design. The best way to do this is to draw around your wax tube to get the shape and then draw a top, bottom, side and front view of your ring. I would really recommend you take the time to do this. I can be pretty slap-dash and do most of my designing through making which can be costly and frustrating at times. After a couple of failed experiments I started drawing designs and found my results were much more successful (what a surprise!). Your drawings don’t need to be detailed or even very good, but a solid idea will make the process much easier.
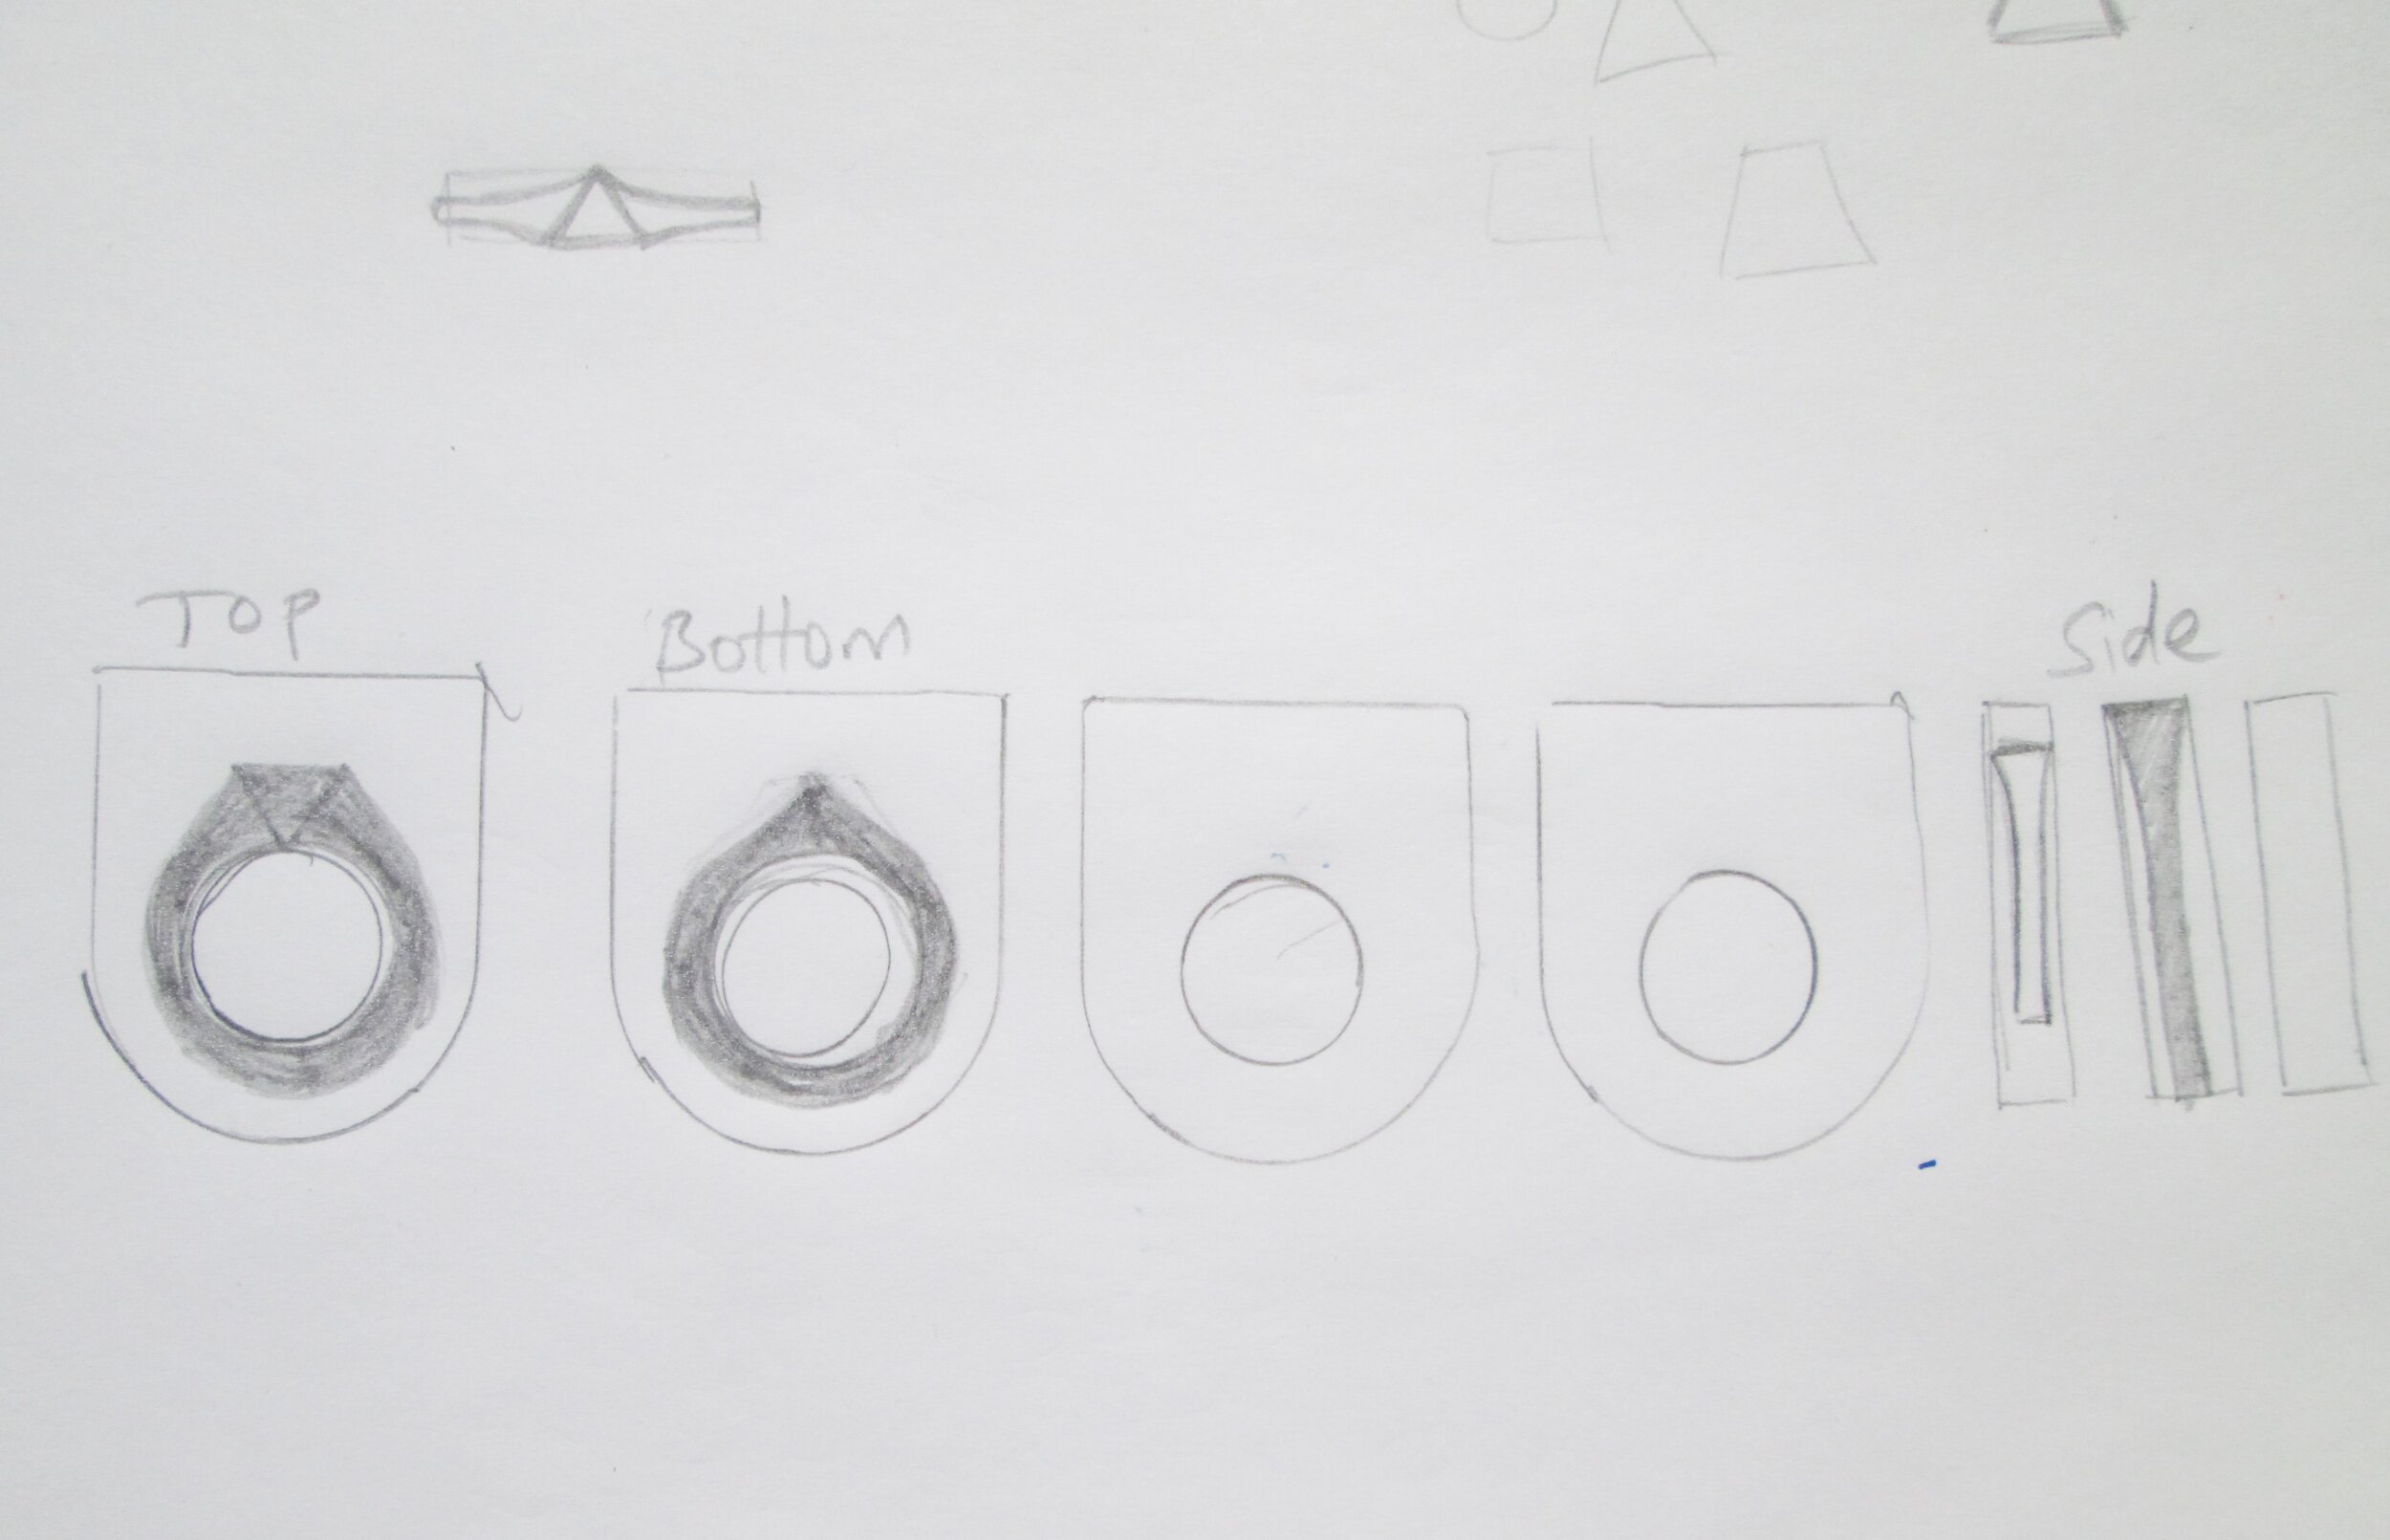
My quick designs

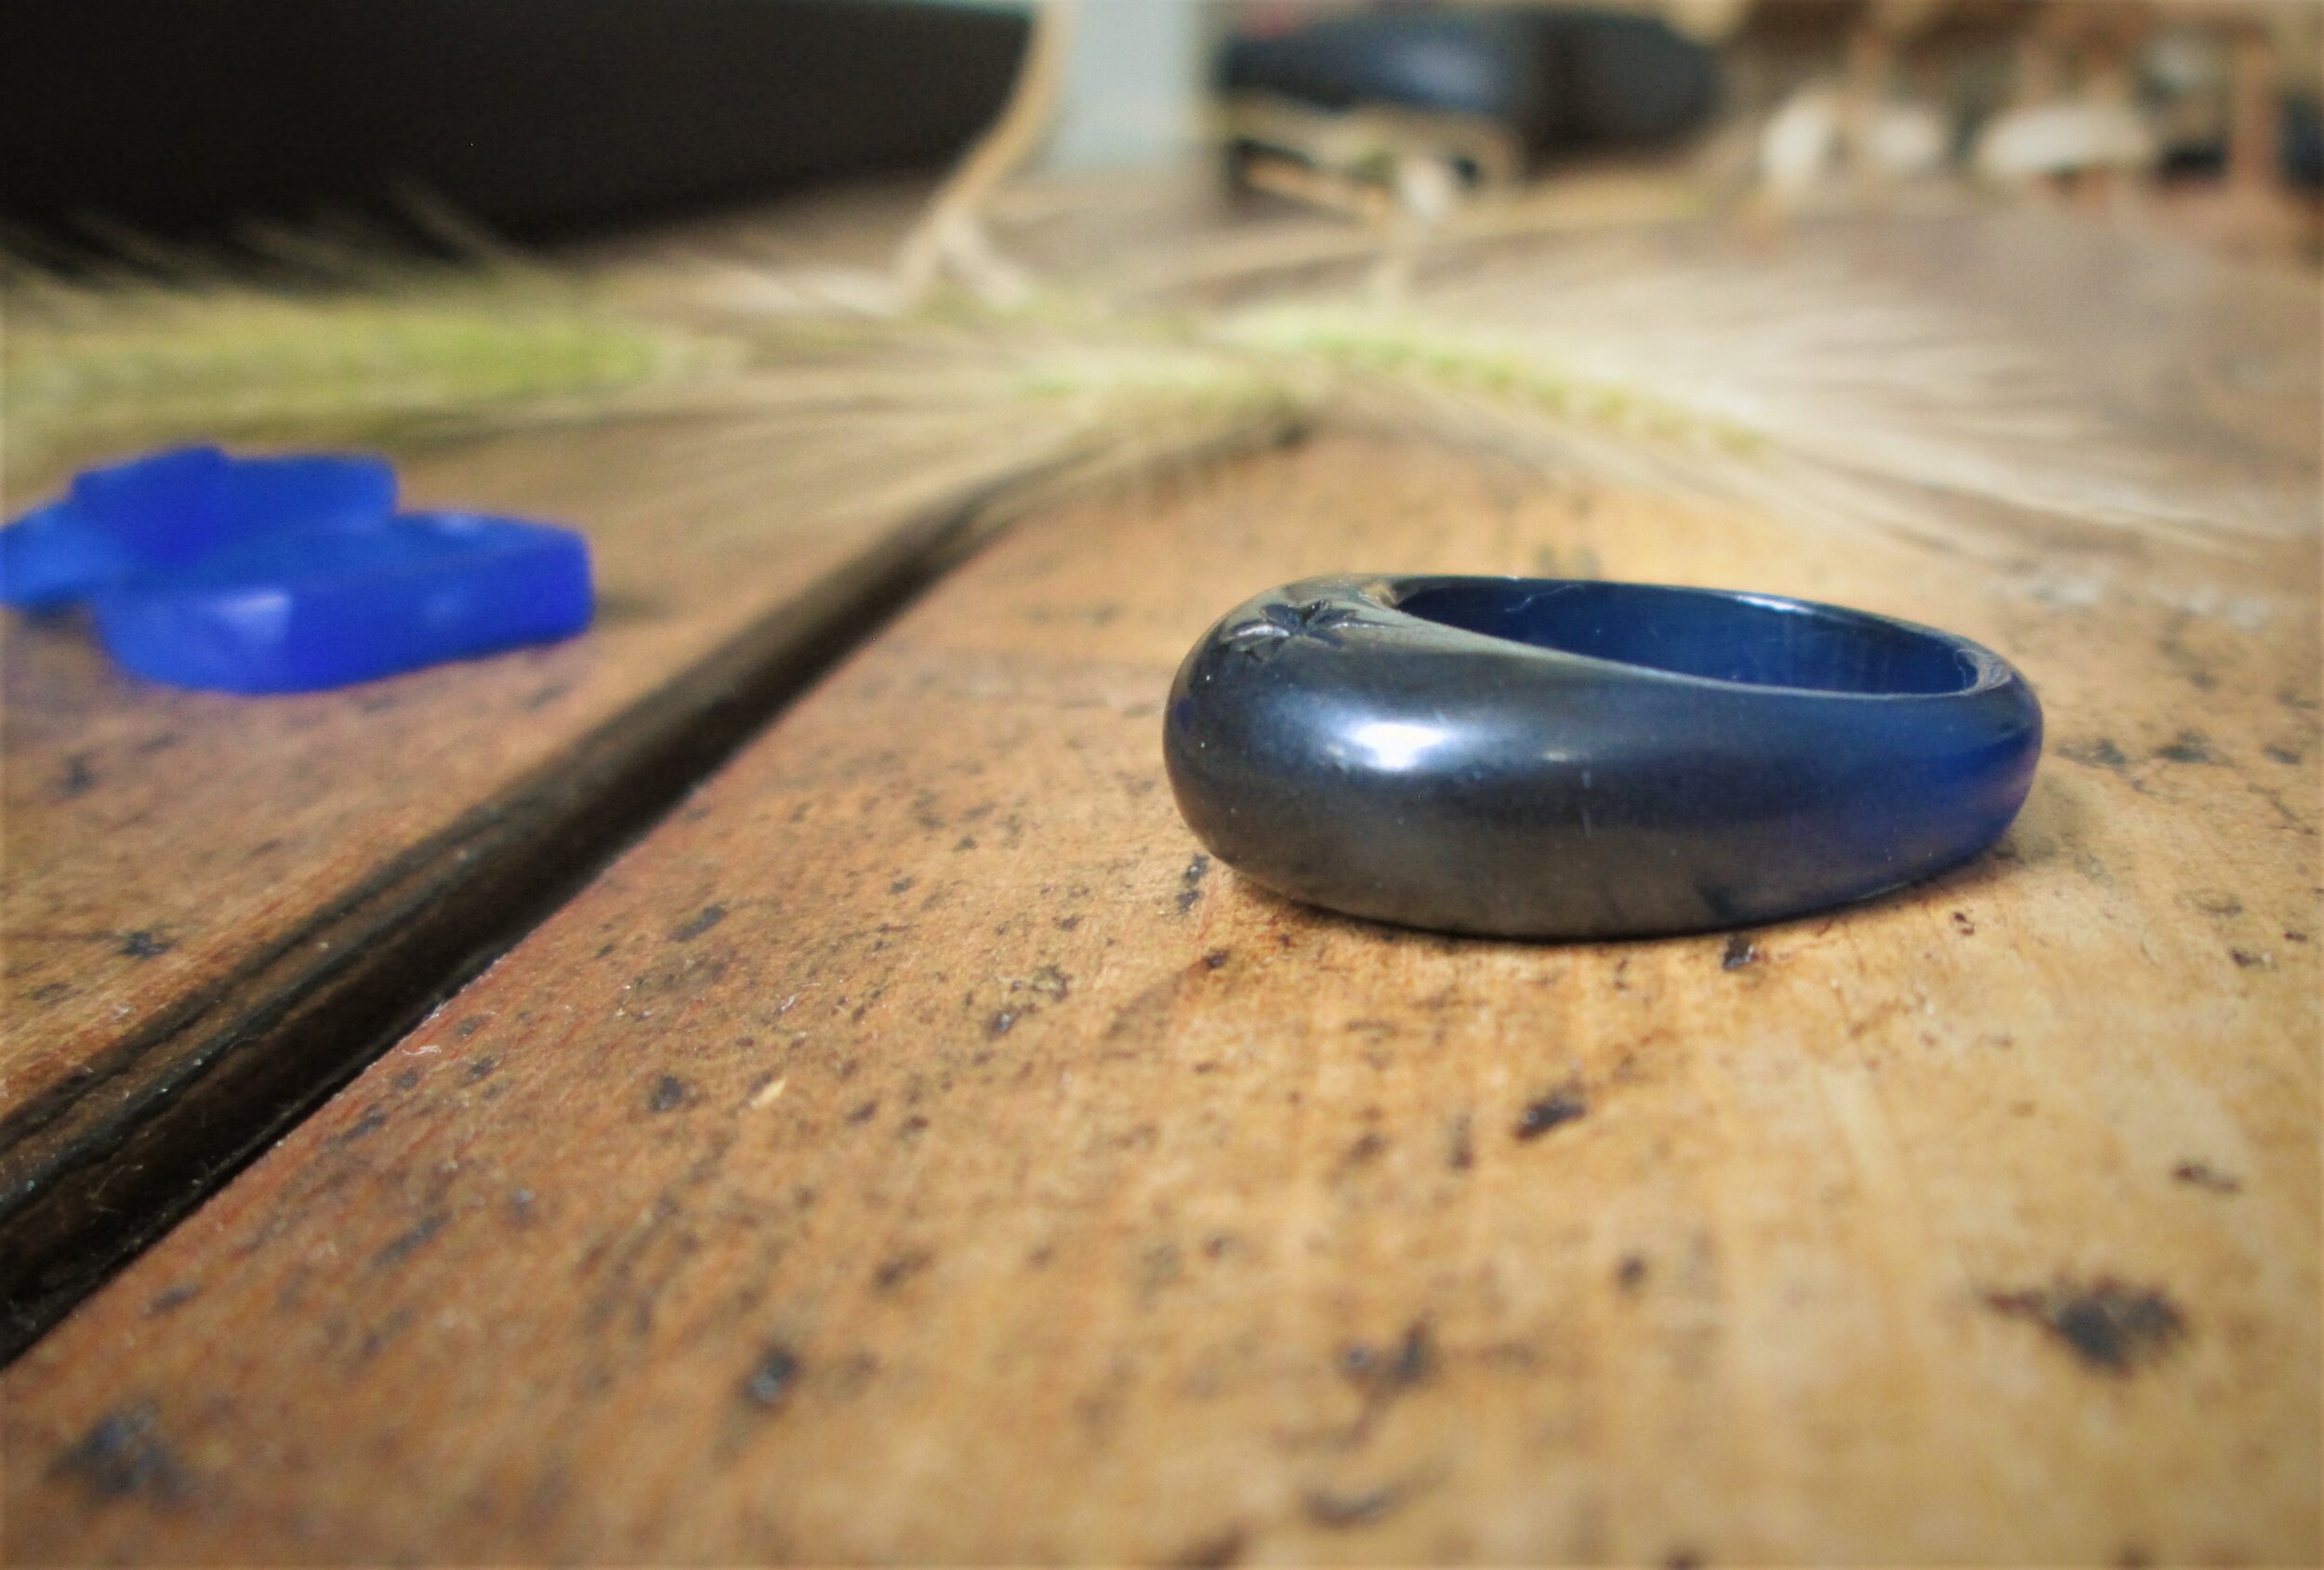
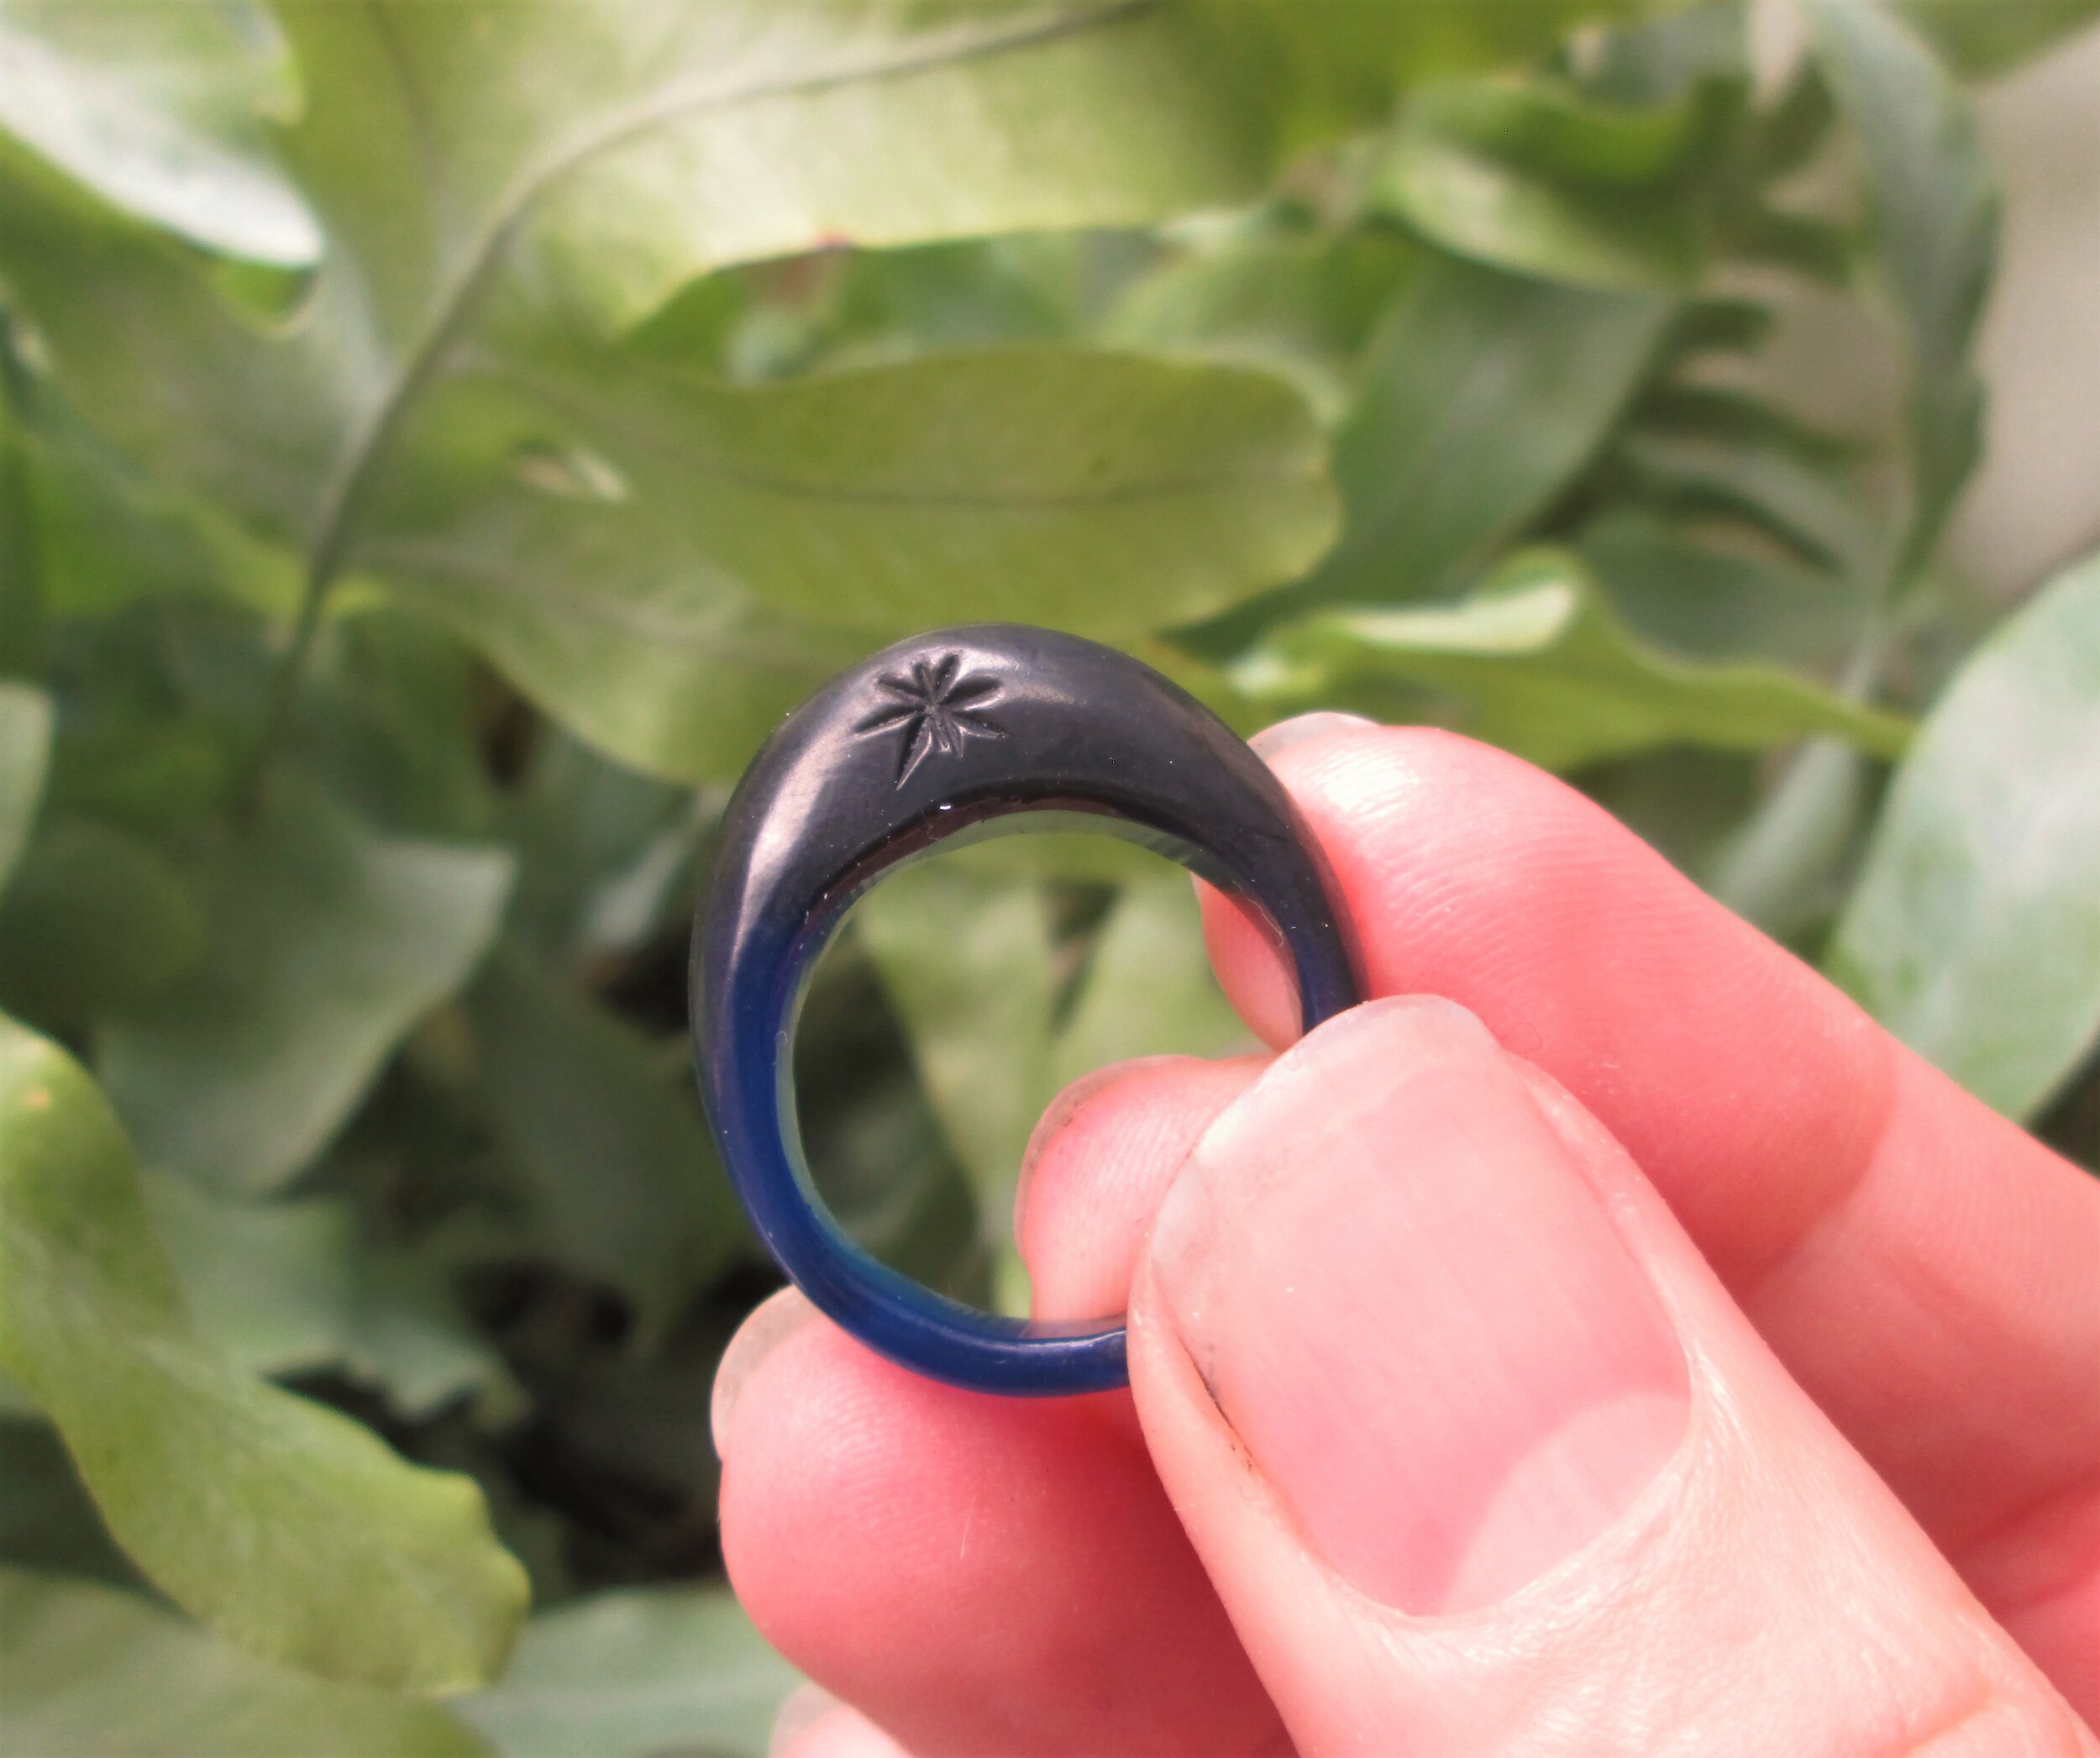
And the resulting ring
Once you know how wide your ring is going to be. Saw a slice off the tube. Start by measuring the depth you want, and ideally marking it with your craft knife or a sharpie, and then saw it using a band saw or hacksaw. Keep checking that you’re sticking to your lines as you go. It’s easy to stray off.
The first stage of carving is a tricky one without the special tools. You’ll have noticed by now that your tube is pretty small in the middle and might just about fit your little finger if you’re lucky…You’ll need to start by carving some of it out. You can get ring sizers which I think have a blade in them to do this job perfectly, but I didn’t have that luxury. So I just carved it out carefully, checking the fit every few go’s. I’m yet to come up with a reliable alternative to this, so if you want to do it properly, I would suggest you buy one of these.
Once you have your wax slice fitting perfectly on your desired finger, you can draw your design on using a sharpie or permanent marker. Remember to draw top and bottom. I’m not sure if there is a perfect way to match the top and bottom but I just drew it on and then adjusted the markings as I got closer.

Now you can start cutting the wax away. Take bigger chunks to start and then get smaller as you get closer to your markings. The video below shows how I did the main bit of carving.
You should be as methodical as you can be. Start by just working on the sides and focusing on getting the top and bottom views perfect. Once you’ve done that you can work on the height.

Experiments in wax
I tried a few different finishing and design techniques that I’d researched online which all produced different results. I’ll go into in a bit more detail below so you can start your rings with a bit of a toolbox of skills and techniques which will inform your designs.
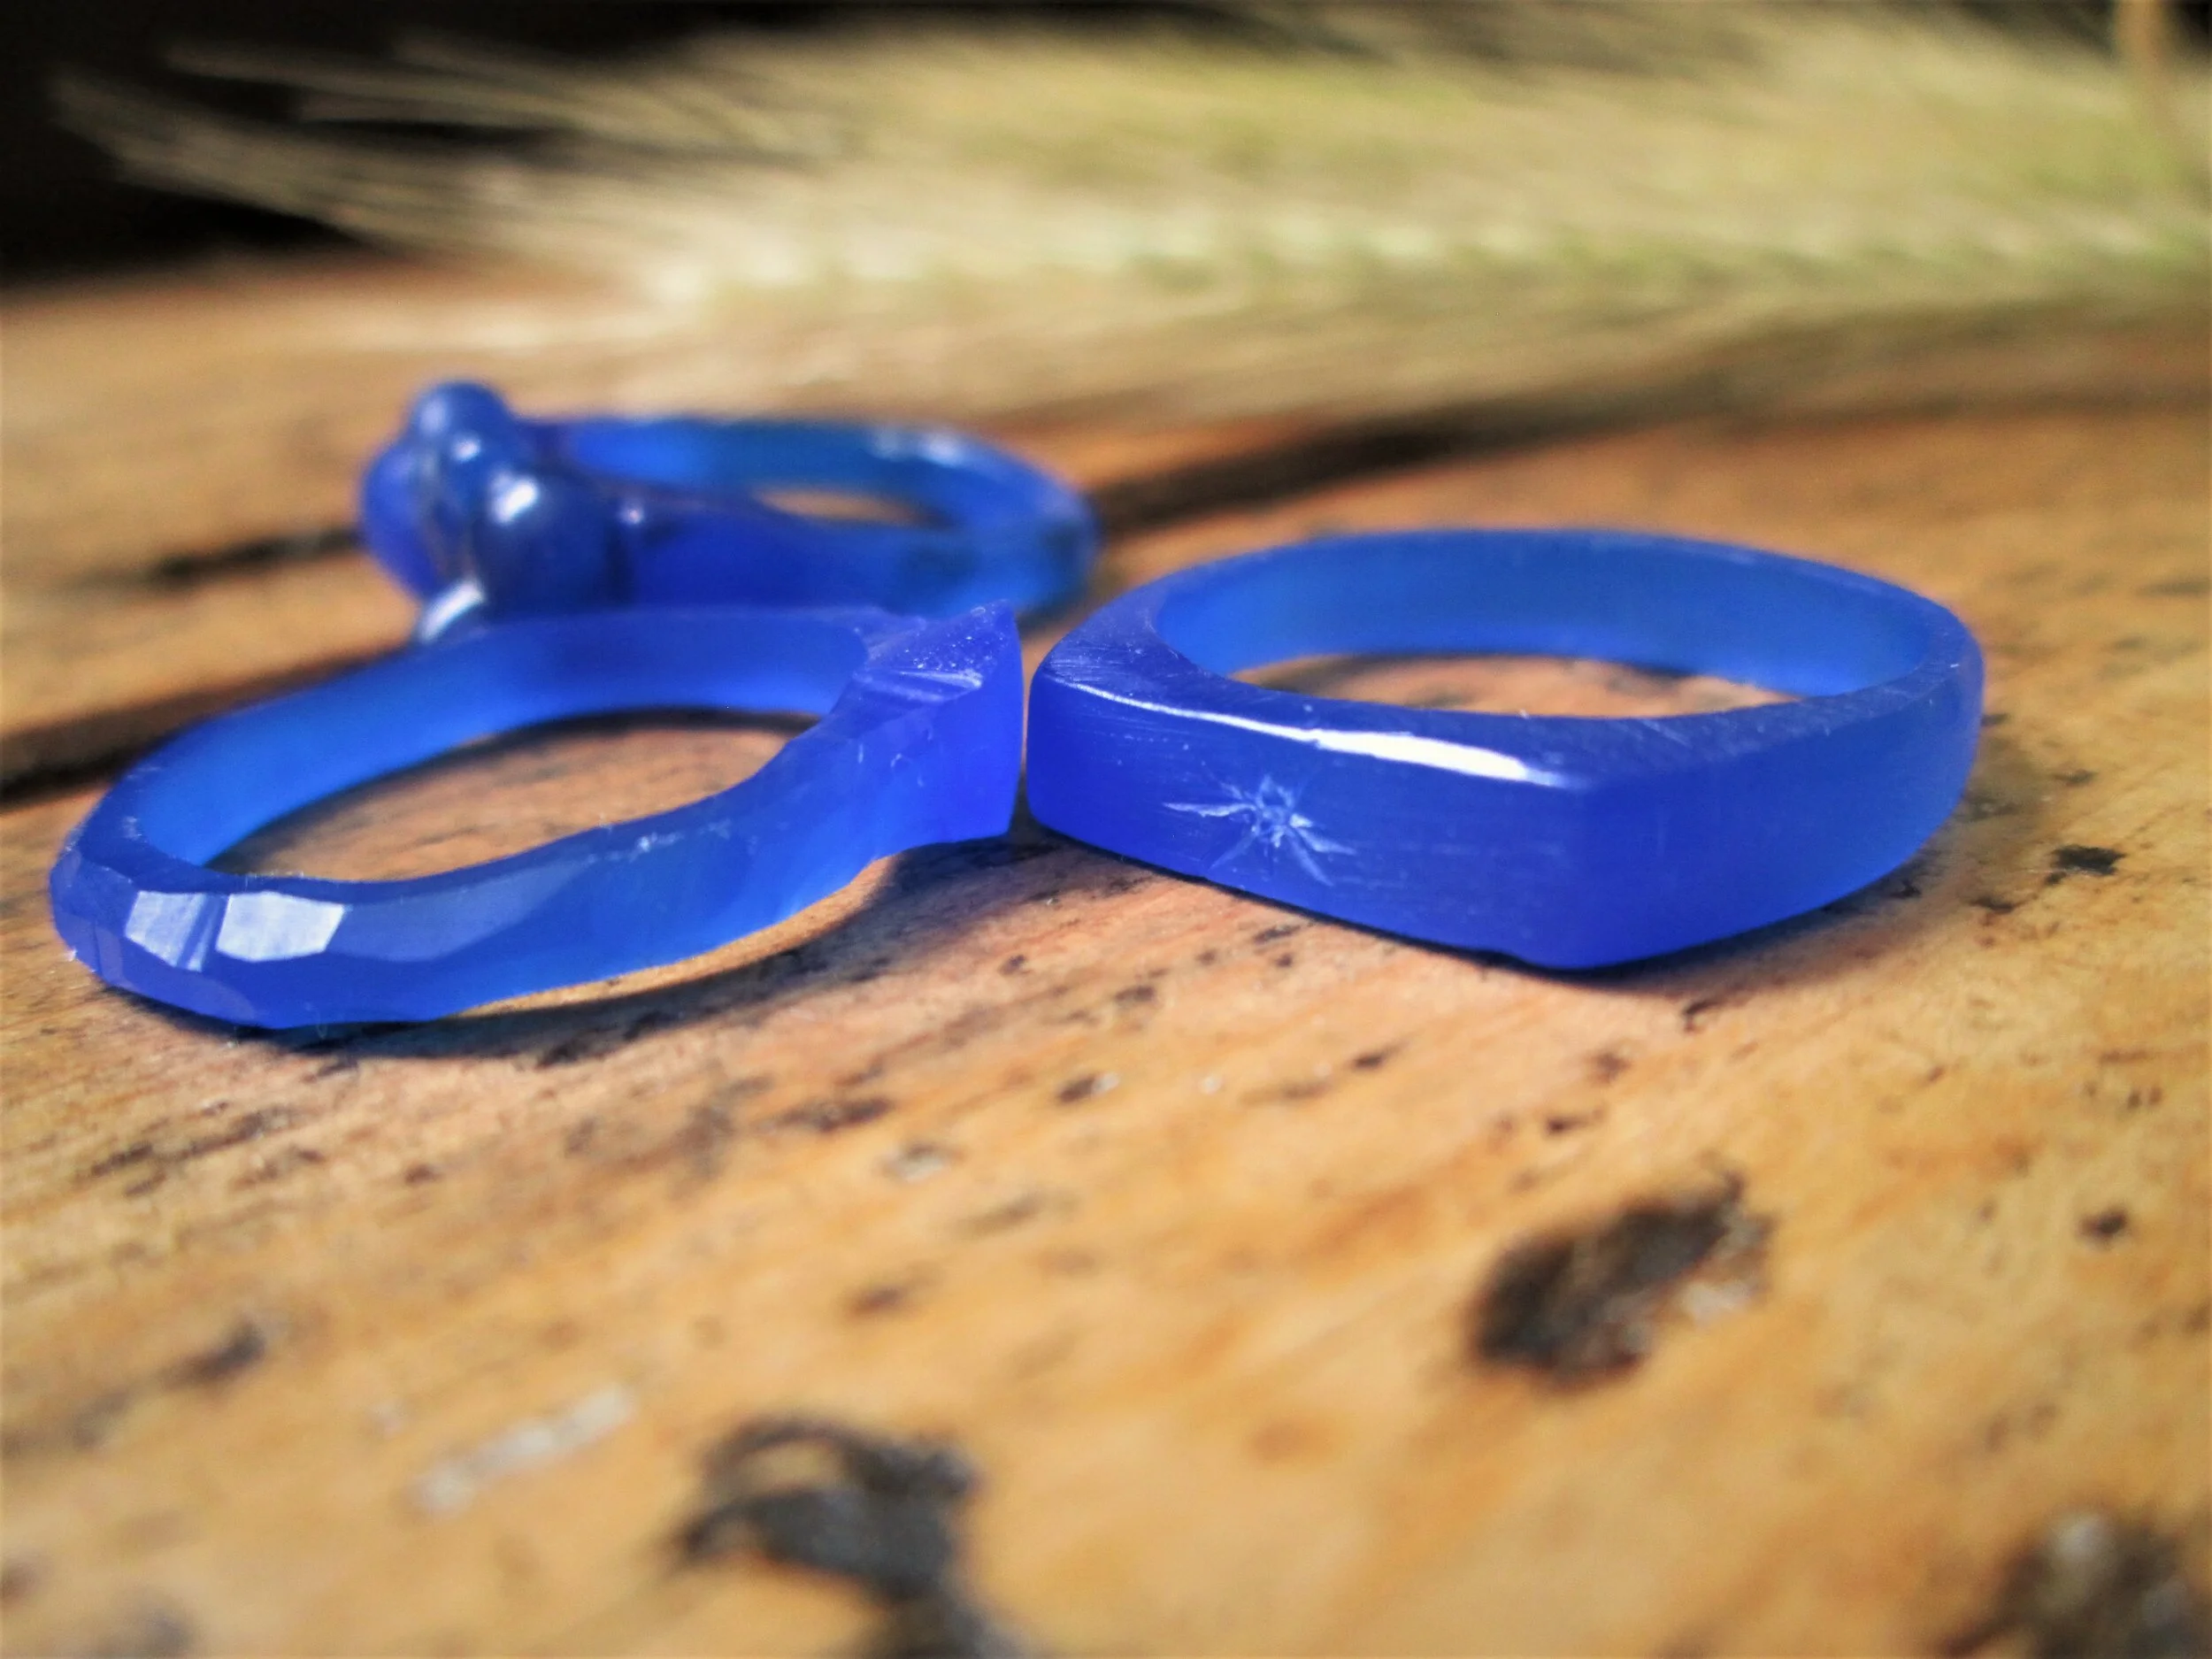
The easiest finish in my opinion is to cut chunks away as I’ve done in the above video and leave your ring as it is. This makes a really interesting geometric style which, when cast in silver will catch the light in a really beautiful way.

The next finish is the super smooth finish on the bulbous ring I made. I did this using a combination of techniques. I carved the shape I wanted using the technique in the video above, then sanded in down with an emery board to get a smoother finish. When I was happy with the shape and finish, I passed the ring through a candle flame a few times until it started to shine. The video below shows how you don’t need to hold the ring in the flame for very long to get the smooth finish.
My first ring attempt was hideously ugly so I wasn’t too upset to use it as a sacrificial experiment. I spiked a chunk of wax on the end of my craft knife and held it over the candle flame until it started to drip. I then took it out of the flame, warmed the ring on the flame for a few seconds and let the wax drip on to the heated area. I did try without melting the ring surface as well but they wouldn’t bind properly. The results might not be that pretty, but they are interesting and there is definitely scope to refine this method and make something really interesting.


If you’re looking for a unique design element, you can easily carve letters or images into your wax using your craft knife, but another super simple personalisation is a fingerprint! Hold your ring over a flame for about 10-20 second until you can see that it’s melted, take it away from the flame and give it a second to cool so you don’t burn your finger too much, and then press your finger into the hot wax. This WILL be hot and feel like its burning so under no circumstances should you do this with kids or babies fingers!! Nice idea to have a baby fingerprint on your ring, but you can get special, safe silver clay for that, this is not the method to use. Have a practice with a piece of scrap wax before you do this with your finished ring so you can gauge how long to heat the wax and how much burning pain you can endure! One important point to make here is that sand casting won’t pick up this level of detail, more info on casting methods below.

Casting
If you buy a wax ring kit, most likely your ring will be cast using the process of lost-wax. Rose Wood Jewellery (my jewellery guru) offered to sand cast one or two of my rings, which is a different process to lost wax casting. With sand casting, you press your ring into sand to make a mould. Whereas with lost wax the mould is made with latex or silicone and the wax is melted out, so you lose your original carving in the process. Lost wax picks up every tiny detail so the better your finish, the less polishing you will need to do.
If you want to get your rings cast, AA Fine Castings have a great reputation and can cast single articles. I called them to get a price and was quoted £10 to cast one ring with silver on top @0.75p a gram. So one small ring would cost about £15 including P&P. The casting price goes down the more you do, so if you have lots of designs it may go down to half that price.
The most important point to make here is that your ring will come back unpolished. You will either need to do the polishing yourself or find a willing jeweller to help you out. If you want to have a go yourself, I would recommend investing in a piercing saw to cut off the sprue (little nubbin where the silver is poured in), some files and a range of micro-mesh sandpapers. I’ll talk a bit more about that in the casting post.


I’m beginning to run out of blog post ideas now. I was thinking of doing some embroidery but I really need to get started on that asap because it’s a bit of a time sponge. Also I’m not sure I have the patience for it so there may be mixed results! Other ideas include Sauerkraut (not really a craft!), lampshade and resin casting. If you have any preference or better ideas, please comment below! I’m open to all sorts :)